[Spring] 스프링 게시판 만들기 - 페이징(Paging) 처리하기
in Spring on Spring, Spring mvc, Jsp
![<p>[Spring] 스프링 게시판 만들기 - 페이징(Paging) 처리하기](/assets/img/programming.jpg)
페이징 처리를 하는 방법은 아주 다양하다.
본 게시글이 이해가 안가거나 맘에 들지 않는다면 다른 페이징 방법도 많으니 한 번 찾아보는것을 추천한다.
페이징(Paging) 처리하기
페이징, 업로드 등 다양한 유틸에 관한 코드를 작성할 패키지를 하나 만든다.
해당 패키지 안에 페이징을 담당할 PagingVO를 만들고 아래 코드를 작성한다.
public class PagingVO {

	// 현재페이지, 시작페이지, 끝페이지, 게시글 총 갯수, 페이지당 글 갯수, 마지막페이지, SQL쿼리에 쓸 start, end
	private int nowPage, startPage, endPage, total, cntPerPage, lastPage, start, end;
	private int cntPage = 5;

	public PagingVO() {
	}
	public PagingVO(int total, int nowPage, int cntPerPage) {
		setNowPage(nowPage);
		setCntPerPage(cntPerPage);
		setTotal(total);
		calcLastPage(getTotal(), getCntPerPage());
		calcStartEndPage(getNowPage(), cntPage);
		calcStartEnd(getNowPage(), getCntPerPage());
	}
	// 제일 마지막 페이지 계산
	public void calcLastPage(int total, int cntPerPage) {
		setLastPage((int) Math.ceil((double)total / (double)cntPerPage));
	}
	// 시작, 끝 페이지 계산
	public void calcStartEndPage(int nowPage, int cntPage) {
		setEndPage(((int)Math.ceil((double)nowPage / (double)cntPage)) * cntPage);
		if (getLastPage() < getEndPage()) {
			setEndPage(getLastPage());
		}
		setStartPage(getEndPage() - cntPage + 1);
		if (getStartPage() < 1) {
			setStartPage(1);
		}
	}
	// DB 쿼리에서 사용할 start, end값 계산
	public void calcStartEnd(int nowPage, int cntPerPage) {
		setEnd(nowPage * cntPerPage);
		setStart(getEnd() - cntPerPage + 1);
	}

	public int getNowPage() {
		return nowPage;
	}
	public void setNowPage(int nowPage) {
		this.nowPage = nowPage;
	}
	public int getStartPage() {
		return startPage;
	}
	public void setStartPage(int startPage) {
		this.startPage = startPage;
	}
	public int getEndPage() {
		return endPage;
	}
	public void setEndPage(int endPage) {
		this.endPage = endPage;
	}
	public int getTotal() {
		return total;
	}
	public void setTotal(int total) {
		this.total = total;
	}
	public int getCntPerPage() {
		return cntPerPage;
	}
	public void setCntPerPage(int cntPerPage) {
		this.cntPerPage = cntPerPage;
	}
	public int getLastPage() {
		return lastPage;
	}
	public void setLastPage(int lastPage) {
		this.lastPage = lastPage;
	}
	public int getStart() {
		return start;
	}
	public void setStart(int start) {
		this.start = start;
	}
	public int getEnd() {
		return end;
	}
	public void setEnd(int end) {
		this.end = end;
	}
	public int setCntPage() {
		return cntPage;
	}
	public void getCntPage(int cntPage) {
		this.cntPage = cntPage;
	}
	@Override
	public String toString() {
		return "PagingVO [nowPage=" + nowPage + ", startPage=" + startPage + ", endPage=" + endPage + ", total=" + total
				+ ", cntPerPage=" + cntPerPage + ", lastPage=" + lastPage + ", start=" + start + ", end=" + end
				+ ", cntPage=" + cntPage + "]";
	}
}
Getter, Setter때문에 코드가 좀 길지만 Get, Set메소드를 제외하면 얼마 되지 않는다.
페이징 알고리즘은 크게 어렵지 않으니 일단 적용한 후에 천천히 읽어보면 이해될 것이다.
<!-- 총 게시글 갯수 출력 -->
<select id="countBoard" resultType="int">
	SELECT COUNT(*) FROM BOARD
</select>

<!-- 페이징 처리 후 게시글 조회 -->
<select id="selectBoard" resultType="com.my.spring.domain.BoardVO">
	SELECT *
		FROM (
			SELECT ROWNUM RN, A.*
				FROM (
						SELECT *
						FROM BOARD
						ORDER BY SEQ DESC
						) A
				)
	WHERE RN BETWEEN #{start} AND #{end}
</select>
BoardMapper.xml에 위 sql문을 작성해준다.
Rownum을 이용해 페이징 처리를 진행한다.
// 게시물 총 갯수
public int countBoard();

// 페이징 처리 게시글 조회
public List<BoardVO> selectBoard(PagingVO vo);
BoardMapper와 BoardService에 위 메소드들을 추가해준다.
@Override
public int countBoard() {
	return mapper.countBoard();
}

@Override
public List<BoardVO> selectBoard(PagingVO vo) {
	return mapper.selectBoard(vo);
}
BoardServiceImpl에 위 메소드들을 추가한다.
@GetMapping("boardList")
public String boardList(PagingVO vo, Model model
		, @RequestParam(value="nowPage", required=false)String nowPage
		, @RequestParam(value="cntPerPage", required=false)String cntPerPage) {

	int total = boardService.countBoard();
	if (nowPage == null && cntPerPage == null) {
		nowPage = "1";
		cntPerPage = "5";
	} else if (nowPage == null) {
		nowPage = "1";
	} else if (cntPerPage == null) {
		cntPerPage = "5";
	}
	vo = new PagingVO(total, Integer.parseInt(nowPage), Integer.parseInt(cntPerPage));
	model.addAttribute("paging", vo);
	model.addAttribute("viewAll", boardService.selectBoard(vo));
	return "board/boardPaging";
}
MainController에 위 메소드를 작성한 뒤 views/board 폴더에 boardPaging.jsp파일을 만든다.
<%@ page language="java" contentType="text/html; charset=UTF-8"
pageEncoding="UTF-8"%>
<%@ taglib prefix="c" uri="http://java.sun.com/jsp/jstl/core" %>
<%@ taglib prefix="fmt" uri="http://java.sun.com/jsp/jstl/fmt" %>
<!DOCTYPE html>
<html>
<head>
<meta http-equiv="Content-Type" content="text/html; charset=UTF-8">
<title>게시판 목록</title>
</head>
<style>
h2 {
text-align: center;
}
table {
width: 100%;
}
#outter {
display: block;
width: 60%;
margin: auto;
}
a {
text-decoration: none;
}
</style>
<script>
function selChange() {
var sel = document.getElementById('cntPerPage').value;
location.href="boardList?nowPage=${paging.nowPage}&cntPerPage="+sel;
}
</script>
<body>
<h2>게시판</h2>
<div id="outter">
<div style="float: right;">
<select id="cntPerPage" name="sel" onchange="selChange()">
<option value="5"
<c:if test="${paging.cntPerPage == 5}">selected</c:if>>5줄 보기</option>
<option value="10"
<c:if test="${paging.cntPerPage == 10}">selected</c:if>>10줄 보기</option>
<option value="15"
<c:if test="${paging.cntPerPage == 15}">selected</c:if>>15줄 보기</option>
<option value="20"
<c:if test="${paging.cntPerPage == 20}">selected</c:if>>20줄 보기</option>
</select>
</div> <!-- 옵션선택 끝 -->
<table border="1">
<tr>
<td>No.</td>
<td width="50%">제목</td>
<td>작성자</td>
<td>등록일</td>
<td>조회수</td>
</tr>
<c:forEach items="${viewAll }" var="list">
<tr>
<td>${list.seq }</td>
<td><a href='detail?seq=${list.seq }'>${list.title }</a></td>
<td>${list.writer }</td>
<td><fmt:formatDate value="${list.regdate }" pattern="yyyy.MM.dd"/> </td>
<td>${list.cnt }</td>
</tr>
</c:forEach>
</table>
<input type="button" value="글쓰기" style="float: right;" onclick="location.href='/write'"><br>
<div style="display: block; text-align: center;">
<c:if test="${paging.startPage != 1 }">
<a href="/boardList?nowPage=${paging.startPage - 1 }&cntPerPage=${paging.cntPerPage}"><</a>
</c:if>
<c:forEach begin="${paging.startPage }" end="${paging.endPage }" var="p">
<c:choose>
<c:when test="${p == paging.nowPage }">
<b>${p }</b>
</c:when>
<c:when test="${p != paging.nowPage }">
<a href="/boardList?nowPage=${p }&cntPerPage=${paging.cntPerPage}">${p }</a>
</c:when>
</c:choose>
</c:forEach>
<c:if test="${paging.endPage != paging.lastPage}">
<a href="/boardList?nowPage=${paging.endPage+1 }&cntPerPage=${paging.cntPerPage}">></a>
</c:if>
</div>
</div>
</body>
</html>
이 전에 작성했던 boardList.jsp를 복사해 페이징에 필요한 부분 몇개를 추가한 것이다.
이제 더미데이터를 잔뜩 만들고 프로젝트를 실행해 테스트해본다.
INSERT INTO BOARD SELECT BOARD_SEQ.NEXTVAL, TITLE, WRITER, CONTENT, REGDATE, CNT FROM BOARD;
이런식으로 더미데이터를 쉽게 불릴 수 있다.
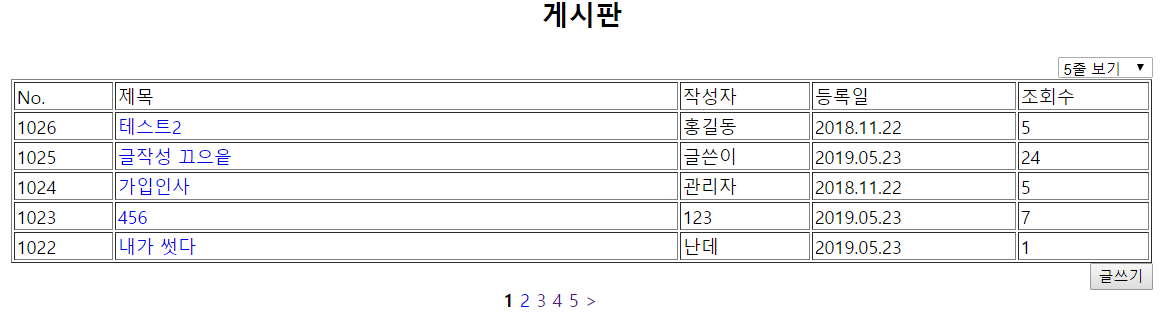
서버를 실행시키고 localhost:포트번호/boardList로 접속하면 이런 화면이 나온다.
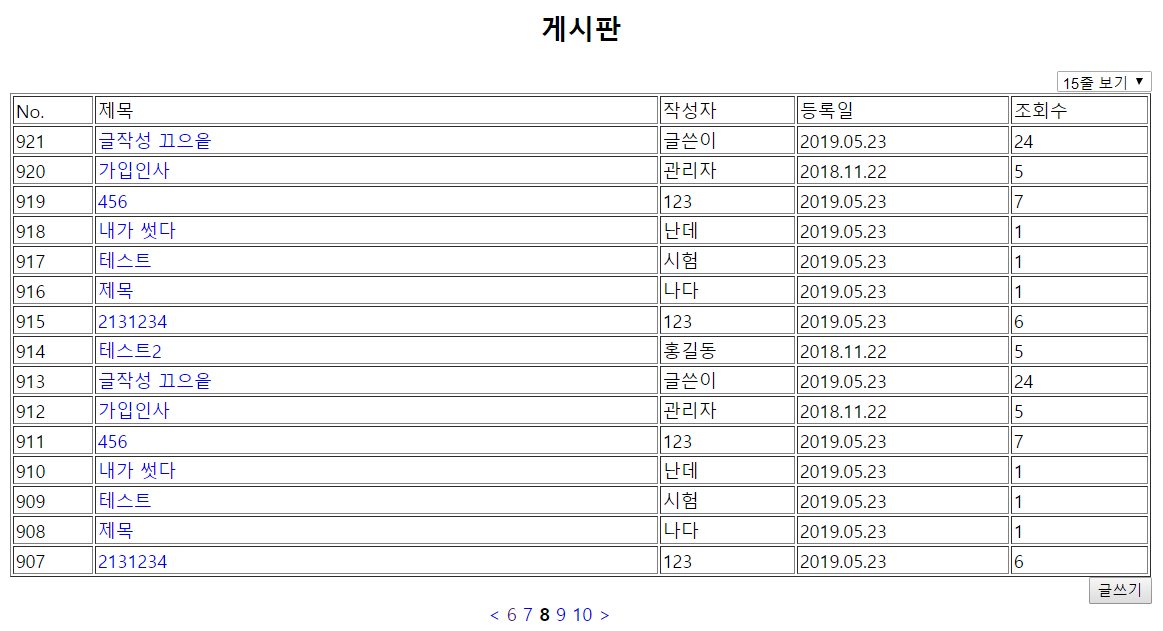
페이지를 이동하거나 갯수를 조절해도 이상없이 작동한다면 성공이다.